Chocolate covered dates

What could be better than fruit and chocolate. All you need is chocolate a microwave and some dates or other dried fruits for dipping. I like dark chocolate with my dates because it’s a nice contrast to the sweetness of the dates. I microwave my chocolate for one minute and then stir. Them for 30 seconds at a time being sure to stir well each time. When your chocolates ready just dunk your dates and line them up on parchment paper until they’re dry.

20111221-101752.jpg

20111221-101800.jpg

White Chocolate Covered Apricots

In my house these white chocolate covered apricots are tradition. I’ve made them every year since I was married and I remember my mom making them for the holidays.

They’re so easy. You just need white chocolate and apricots. I melted my chocolate in the microwave for one minute and then stirred it and then microwaved again for one minute. Then I tossed my apricots in made sure they were coated evenly and then I used a small pickle fork to fish them out. I left them on parchment paper to sit until the chocolate hardens. They are so easy and they look great on any holiday dessert plate.

20111220-200403.jpg

20111220-200413.jpg

20111221-101108.jpg

Latkes and Homemade Applesauce for Hanukkah

So I know what you’re thinking. If you’ve been paying any attention to my blog there’s been a lot of posts about Christmas. The truth is I’m at least a quarter Jewish (in my mind). Ok so my step father is Jewish and I lived in Israel for a year. Plus potato pancakes were one of the first recipes I learned to make as a kid. I was probably about five or six when I learned the recipe in school. After I learned to make them my mom and I would make latkes and applesauce all the time.

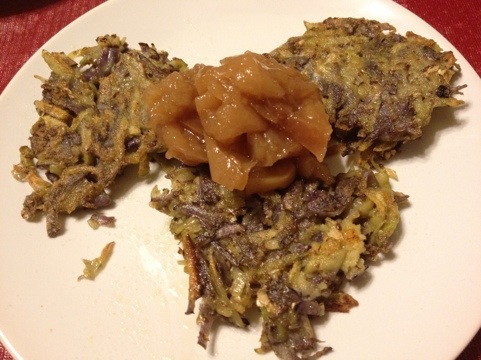
There are two basic style of latke. There are shredded and mashed potato style. The easiest by far are the shredded and this is the recipe I first learned to make as a little girl. For my latkes today I substituted flax meal for the flour to make my latkes gluten free plus they’re a little bit healthier and you don’t miss the flour one bit you really just need something to act as a binder. So here’s my slightly modified latke recipe.

2 cups grated potatoes
2 cloves minced garlic
2 tablespoons of ground flax seeds
2 eggs
Oil for frying

I had an assorted bag of fingerling potatoes there were purple, red, gold, and white potatoes. I shredded them with a cheese grater until I had about two cups. I mixed in two cloves of garlic minced, two tablespoons of flax seeds, and two eggs. In a frying pan I heated my oil until it pops. The key to good latkes is hot oil. I used a tablespoon sized spoon to scoop my latke mixture into the frying pan. Then just cook until their golden brown.

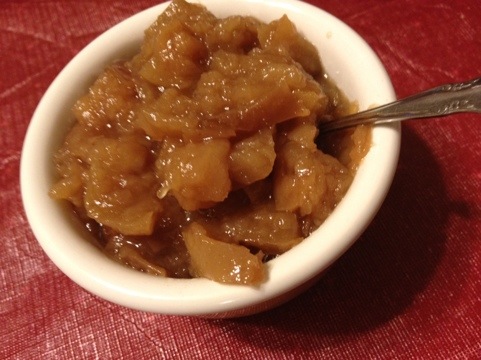
For quick home made applesauce all you need is

apples
sugar
cinnamon

I cut and core my apples leaving the skin on and place them in a sauce pan. I add about a half a cup of sugar to start the apples cooking. I cook my apples on medium low heat with the cover on until their soft. Once your apples have become sauce add sugar and cinnamon to taste. So easy and so yummy! You can use any apples you want. The amount of sugar will change depending on the type and amount of apples you use.

Happy Hanukkah everyone!

20111220-185655.jpg

20111220-185727.jpg

20111220-185735.jpg

20111220-185741.jpg

Gingerbread house stocking

I made stockings for my two boys this year and I wanted to decorate them with something special that they would really like. My older son is really into houses. You know windows, doors, a roof, he loves them all. Some kids love cars or trains, he loves houses. We bought him a lego set that came with three doors. He slept with those doors for at least a week. So I thought what could be better than a gingerbread house?

To make the gingerbread house stocking I first found a picture of a gingerbread house to copy. I cut the house out as a pattern to cut my tan felt for the house shape. Then I made my candy and frosting out of different colors of felt. When I was finished cutting I laid my pieces out and glued them onto the stocking with fabric glue. Then left it overnight to dry.

The whole project took me about an hour. Which was well worth the time. My son was so excited in the morning to see his stocking “so perfect” for the holidays.

20111220-095439.jpg

20111220-095447.jpg

20111220-095455.jpg

White chocolate lemon truffles

These truffles are so lemony and buttery. They’re just delicious. They’re also SO easy.

2 cups white chocolate chips
10 tablespoons of unsalted butter
2 teaspoons lemon extract
1/2 teaspoon of salt
Powdered sugar for dusting

I melted my chocolate and butter together in the microwave. The key to making truffles in the microwave is to go slow and don’t overdo it. I start with one minute then stopped to mix. Then keep warming the chocolate 30 seconds at a time making sure to stir. Once my chocolate and butter were melted together and smooth I stirred in my extract and salt. Chill the mixture in the fridge for two hours. Use a small spoon to scoop out the truffles. Roll the truffles into balls and then til them in powdered sugar. I keep my truffles in the fridge to keep them from getting soft until I’m ready to serve them or hand them out as gifts. I got around 30 truffles from this recipe.

20111219-222654.jpg

20111219-222701.jpg

Healthy fudge pops

These are so delicious just bananas and Nutella. I put two bananas and about a third of a cup of nutella in my magic bullet. I added just a little bit of liquid, in my case almond milk, as needed to make it easier to blend. Then I just poured them in my Popsicle molds and waited. My three year old hasn’t eaten a banana in at least six months and he’s had three of these already. A good healthy frozen snack for grown ups to.

20111219-192702.jpg

Reindeer finger print ornaments

These are so easy and so cute. My three year old had a great time doing these. All you need are glass ball ornaments and acrylic paint.

I let my son choose if he wanted to do each finger or one finger multiple times. He chose his pointer finger (excellent choice). He dipped his finger in brown paint. I held the ornament and guided his hand as he left his finger prints. I used the packaging the ornaments came in as a drying rack. Then I just added the little eyes, noses and antlers with black paint, except of course for Rudolph’s red nose. Each ornament got one Rudolph. I also wrote his name and the year on the back of each one of these.

To keep my wiggly three year old busy while I painted in the details on both his and his brothers ornaments I gave him some kid friendly paints and let him go to town on plates, paper, and even the leftover glass ornaments. He loved that we were painting together and it gave me enough time to get the project done.

20111218-234911.jpg

20111219-000421.jpg

Snowman hand print ornament

I just love these cute little snowman fingers. I just can’t stop looking at them. To do this project all you need is glass ball ornaments and acrylic paint. I spread a thin even amount of white paint onto a paper plate. I had my son strapped into his high hair. I had the ornament close by and ready. I dipped his hand and then got him to grab on to the ornament. After i had my hand prints set i painted on little hats and scarves and the snowmen’s little faces. You could get more creative with your hats and scarves. I went for the classic snowman look.

I made sure to have extra ornaments on hand in case I messed one up. Just as I thought my first one was the messiest. Really that one was fine too. My best advice is to just relax and use the flaws to your advantage. Anywhere that I saw streaks where his finger smudged the paint I made the snowmen’s scarves look like their blowing in the wind . Really they’re all adorable. You can also wipe with a paper towel and warm water any serious mistakes.

These are SO adorable and would make a great gift for grandparents. On the back I wrote his name and the year with a permanent marker. I can’t wait to share these with family on Christmas.

20111218-233819.jpg

20111218-233845.jpg

20111219-134200.jpg

Give gifts with meaning

This Christmas I’m giving gifts that have meaning. Just this morning my kids helped me do just that. Orion lent a finger and Gabe lent a hand and we made ornaments that we hope will be treasured for years to come. Then I carefully added the ribbons and packed them up. I’ll post more about how I made them in a little bit. I just couldn’t wait to share.

20111218-133338.jpg

20111218-133350.jpg